Setting up your SSH Server. Step by Step
Please make sure to read to the end to avoid running into problems.
Note: It may be best to generate new keys and a new server if you have done so already but got stuck. The following guide will take you through each possible step.
1. Generate your ssh key pairs
For this blog, we will be creating our keys in a file called school. You can actually use whatever you want.
You can either use this script or follow the steps laid out below the script to achieve this
Copy this script to a file called createKey. Then run chmod +x createKey.Execute the script ./createKey. Then You can skip to step 2.
#!/usr/bin/env bash
# This script creates an RSA key pair
if [ ! -d ~/.ssh ]; then
    mkdir ~/.ssh
fi
ssh-keygen -t rsa -f ~/.ssh/school -N ""
If that didn't work out,...
You would have to attempt to create this directory with the command below.
mkdir ~/.ssh
It will either create the directory if it doesn't exist yet or tell you that it already exists.
Now you can generate your ssh key pairs.
ssh-keygen
On running the above command, It will prompt u for a location to save the key to.
You will save it to a file called ~/.ssh/school
~/.ssh/schoolis actually a path to a file calledschoolin the.sshdirectory in the current user's home directory.So by typing
~/.ssh/schoolLinux knows to save that file while following along that path.
It will also prompt for a password. U can enter one if you choose or simply press Enter if you don't want one.
This will automatically create 2 new files in the directory ~/.ssh
Notice there are now files(Ignore the other files):
school- contains your Private keyschool.pub- contains your Public key

2. Save your information to your intranet
This block is for anyone who already created a server.
If you have already created a server which is mentioned in step 3. You can use this script to add your key to your server and skip steps 2 and 3 if you want.
- Replace
52.3.248.23with your serverip address(also mentioned in step 3)#!/usr/bin/env bash # This script adds the public key to the server ssh-copy-id -i ~/.ssh/school.pub ubuntu@52.3.248.23
For this step, u must copy the contents of school.pub and go to your alx intranet profile and paste it in the field SSH public key right under Technical information
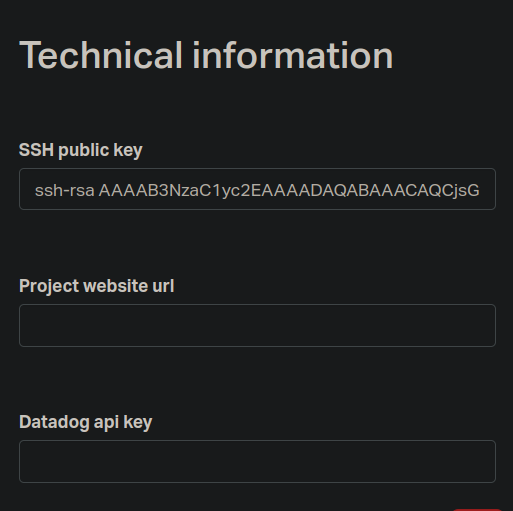
Do not forget to scroll down to the bottom of the page and click
Save my information

3. Create a new Server
Note: If u end up having to generate your keys again.
Use the script below to copy it to your server.
- Replace
52.3.248.23with your serverip address#!/usr/bin/env bash # This script adds the public key to the server ssh-copy-id -i ~/.ssh/school.pub ubuntu@52.3.248.23
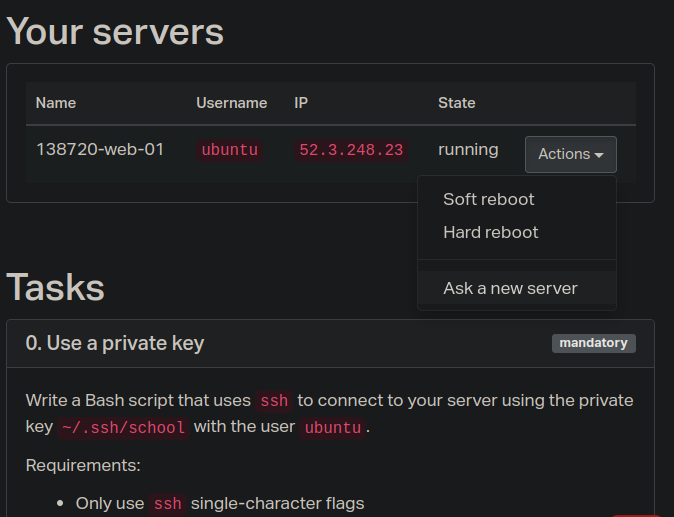
Click 0x0B-ssh to go to your project page on the intranet if you aren't already there.
Scroll down till you get to the part shown in the picture above. Right on top of the Task 0. Use a private key. You can create a new server just by clicking on Ask for a new server, highlighted in the image above.
Note: Refresh the page after doing this, especially if under the
Statecolumn, you still seepending.
The most important details there are these below(in my case, mine are indicated in brackets below)
Username (ubuntu)
IP (52.3.248.23)
You're advised to note down yours as you will be using it in the next section, where you will be attempting to connect to your server.
4. Connecting to your server
For this section, you have to open a file called config in the directory ~/.ssh
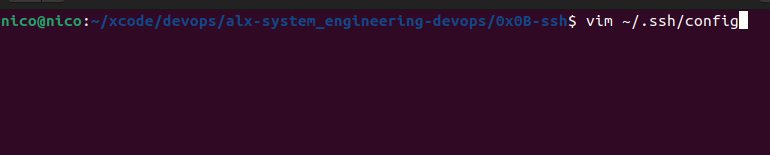
Open the file with whatever editor of your choice.
Now u must set up this config file following the instructions below:
To configure the SSH client to use the private key ~/.ssh/school and refuse to authenticate using a password.
Host *
    PasswordAuthentication no

Host myserver
    Hostname <server_hostname_or_IP_address>
    User <remote_username>
    IdentityFile ~/.ssh/school
Note: Another example is below, and make sure to not include
<or>in your details.They are usually used to indicate placeholders, as in values that should be replaced.
Explanation:
Host *applies the following configuration to all hosts, and sets thePasswordAuthenticationoption tonoto refuse password authentication.Host myserverspecifies the configuration for the specific server that you want to connect to. Replace<server_hostname_or_IP_address>with the hostname or IP address of your server, and<remote_username>with your remote username.Hostnamespecifies the hostname or IP address of the remote server.Userspecifies the remote username that you want to use to connect to the server.IdentityFilespecifies the path to the private key that you want to use for authentication. In this case,~/.ssh/school.
Make sure to replace <server_hostname_or_IP_address> and <remote_username> with the actual values for your server.
Save the changes to the ~/.ssh/config file and then try to connect to the server with the command ssh myserver. The SSH client should now use the private key ~/.ssh/school for authentication and refuse password authentication.
Question: Can I name it whatever I want, as in here: Host myserver?
Yes, you can name it whatever you want.
When you specify a Host section in the SSH configuration file, you are defining an alias for a particular host. The Host name can be any string of your choice, as long as it does not conflict with any other configuration in the file.
You can use any name that is meaningful and easy for you to remember. For example, you might use the server's hostname or IP address as the Host name, or you might choose a nickname that is easier to remember.
For example:
Host school
    Hostname 52.3.248.23
    User ubuntu
    IdentityFile ~/.ssh/school

    PasswordAuthentication no
In this example, school is an arbitrary name that I have chosen to represent myserver. When you run the ssh command with the argument school, the SSH client will look up the Host section in the configuration file and use the settings specified there to connect to the server.


The pictures above show the top and bottom after running the command:
ssh -v school
or you can log in with
ssh -v ubuntu@52.3.248.23
Replace 52.3.248.23 with the ip address of your own server.
My server has no interest in connecting with you :(
To log out, Type exit and Enter.
Question: How to add an SSH public key to a server?
Shorter method
You can use the ssh-copy-id command to copy the public key to the server and add it to the authorized_keys file at the same time.
To use ssh-copy-id, follow these steps:
Open a terminal on your local machine.
You have to do the following while in one directory
For example,
cd/root, and execute the following commands while in there.Copy the public key into a file given to you, you can name the file
alxI imagine you must have been given a key to copy to your server, so the person can access your server.
Use the following command to copy the public key to the server:
ssh-copy-id -i ./alx ubuntu@<server-ip-address>
make sure to not include
<or>in your details.
example:
ssh-copy-id -i ./alx ubuntu@52.3.248.23
Replace <server-ip-address> with the IP address or hostname of your server.
Enter the password for the Ubuntu user when prompted.
The ssh-copy-id command will automatically create the .ssh directory and the authorized_keys file on the server, and set the correct permissions. It will also add your public key to the authorized_keys file.
You can now connect to the server using SSH without entering a password:
ssh ubuntu@<server-ip-address>
Note that ssh-copy-id is included in most Linux distributions, but if it is not installed on your system, you can install it using your package manager. For example, on Ubuntu, you can install it with the following command:
sudo apt-get install openssh-client
Longer method
If you logged out of your server, log in again. The following instructions must be carried out in your remote server
If the
.sshdirectory does not exist in theubuntuuser's home directory, create it:mkdir ~/.sshOpen the
authorized_keysfile in the.sshdirectory for editing:vim ~/.ssh/authorized_keysCopy the SSH public key provided(I assume that you must have been provided with a public key) and paste it at the end of the file and save the changes.
Set the correct file permissions for the
authorized_keysfile:chmod 600 ~/.ssh/authorized_keysExit the SSH session.
After following these steps, anyone with the corresponding private key will be able to connect to the server using the ubuntu user.
Bonus (Generate 4096-bit RSA ssh key pair)
Question: Write a Bash script that creates an RSA key pair
Here is a Bash script that will create an RSA key pair with the specified requirements:
#!/bin/bash

# Generate an RSA key pair with a 4096-bit key length and a passphrase
ssh-keygen -t rsa -b 4096 -f school -N "betty"

echo "RSA key pair created successfully!"
This script uses the "ssh-keygen" command with the "-t" option to specify the RSA algorithm, "-b" option to specify the number of bits in the key, "-f" option to specify the filename for the private key, and "-N" option to specify the passphrase.
Save this script to a file, make it executable with the command chmod +x filename, and then execute it with the command ./filename to create the RSA key pair. The private key will be saved in a file named "school" in the current directory.
Note: This will only generate a key pair that you can simply save to a file called
schoolin your current directory.Please do not try to save in
~/.sshat this point. I made this mistake myself, and even if it didn't have adverse consequences. I would have preferred not to have done so.
Possible Errors You might encounter
ubuntu@52.3.248.23: Permission denied(publickey)
The above error occurs because your public key wasn't added to your server.
Go back to step 1 if a file school.pub doesn't exist in the directory ~/.ssh.
run ls ~/.ssh to confirm.
Use this command to add your public key to the server.
ssh-copy-id -i ~/.ssh/school.pub ubuntu@52.3.248.23
Keynotes:
This assumes that your key was saved in the file
~/.ssh/school.pub.Replace
~/.ssh/school.pubwith the name of the file containing your public key if that's not it. If you used the default, it would be~/.ssh/id_rsa.pubReplace the IP address
52.3.248.23with your server IP addressThe other option is to start all over :)
ssh: Could not resolve hostname school: Temporary failure in name resolution
The above error may occur if you made an error in your config file ~/.ssh/config. Cross-check that it exists and that it looks like this(with your own details):
Host school
    Hostname 52.3.248.23
    User ubuntu
    IdentityFile ~/.ssh/school

    PasswordAuthentication no
Thanks for reading💙.

